Tag Archives: Lens

Blurry Photos? #Blur #Fuzzy #Sharpness #Helios44 #Bokeh #Apodisation

Post by Paul Henni

This is a longer than usual post and goes on a wee bit, but I hope there’s enough in it to help someone else with their photography.

When I first got stuck into photography more seriously back in 2013, I spent a lot of time reading articles in magazines and books to try work out how to create good images, as you do.

I also engaged with others online asking dumb questions and, mostly, getting patient replies. If you were one of those who replied patiently – thank you.

Over time, I have come to realise that there is a wide range of conflicting advice, a lot of it driven by those trying to sell something. A lot like life then I suppose.

Oh, and lists or listicles. You know, those things that rhyme with testicles and are also mostly bollocks. Top five things to improve your…insert list here. Sometimes it is a top ten:-

  • Take
  • Better
  • Photographs
  • By
  • Getting
  • Yourself
  • Out
  • With
  • Your
  • Camera

Anyway, this rambling preamble isn’t about lists, it is about the pursuit of ‘Sharpness’. It seems there are a few common things with new photographers, which have been well described, often mildly humorously, such as obsession with expensive gear, how get get pin sharp images, why their camera doesn’t take good shots, using HDR (badly) etc. Here’s a graph that seems to have originated on robertbenson.com (if not, please let me know):

Stages Of A Photographer (Creator unknown, possibly www.robertbenson.com).
Stages Of A Photographer (Creator unknown, possibly http://www.robertbenson.com).


I don’t know where I am now on this graph , but I do recognise The HDR Hole in particular and I’m not dead (yet).

And so back to the main gist of this post – ‘Sharpness’. Thankfully, I now appear to have found some of the right people to listen to, either via discussion or by reading what they have to say on photography. Composition and light are key. A clear idea of what you are trying to create is important too, as is practice. Having an image in focus is good, having a pin sharp image can be good for specific purposes, but is less essential, I think, for what I want to achieve.

Which leads on to ‘Blur’ or having out of focus areas of your image, such as ‘Bokeh’ as it commonly called – the blurry background in a shot taken at a wide open aperture with a near focal point. Blur can also be created through slower shutter speeds for moving objects.

I stumbled across an article by Viktor Pavlovic on ‘Extremely Swirly Bokeh’ about using old Helios 44 lenses with a reversed front element to get an effect called Apodisation. Thanks to the very helpful and friendly Joe at JP Camera Repair in Edinburgh, I found myself with an M42 adapter for my Fujifilm XE-2 and two Helios 44 f2 / 58mm lenses, one with a switched front element. The XE-2 can be set to shoot with no lens mode to allow use of these manual focus lenses via the adapter.

Photo by and copyright of Paul Henni.

Finally, after all these words, we get to the photos. Here are a selection of images to give you an idea of what this technique can achieve. It is tricky to get used to, will not work for all scenes and is not good with very bright light. It does work nicely with Macro rings on my XE-2.  The ‘straight’ Helios 44 also has a nice softness for portraiture. What has been great about trying this out is both the fun of experimenting and the re-learnt appreciation of my excellent Fujifilm XF lenses.

Another Thistle. Photo by and Copyright of Paul Henni.
Scottish Thistle (Colour). Photo by and copyright of Paul Henni.
Self Portrait. Photo by and copyright of Paul Henni.


The Way Of The Tractor. Photo by and copyright of Paul Henni.
The Way Forward? Photo by and copyright of Paul Henni.
Long Dalmahoy Road. Photo by and copyright of Paul Henni.
Grasses (Study). Photo by and copyright of Paul Henni.
Stepping Into The Light 1. Photo by and copyright of Paul Henni.
In The Woods. Photo by and copyright of Paul Henni.
Corn. Photo by and copyright of Paul Henni.
Flower Study 2, In The Botanics, Edinburgh. Photo by and copyright of Paul Henni.
Flower Study 3, In The Botanics, Edinburgh. Photo by and copyright of Paul Henni.
Flower Study 4 (crop), In The Botanics, Edinburgh. Photo by and copyright of Paul Henni.
Living The Slow Life 3. Photo by and copyright of Paul Henni.
Living The Slow Life 2. Photo by and copyright of Paul Henni.
Living The Slow Life 1. Photo by and copyright of Paul Henni.
News Steps, Lens Testing. Photo by and copyright of Paul Henni.

To finish, some examples of the standard Helios 44 lens with a normal front element.

Simon. Photo by and copyright of Paul Henni.
Thistle, In The Botanics, Edinburgh. hoto by and copyright of Paul Henni.


How to… #BW #Blackandwhite #Photo #Convert #Fujifilm #X-Series #Camera #Adobe #Photoshop #RAW #Google #NIK #SilverEfex

Post by Paul Henni

Making Black and White Images – What We do.

We have been asked quite a few times about how we make our images, so I thought I’d write a wee bit on what we do, the we being me and Lynn, my partner in henni.photo.

Firstly, some background and a disclaimer.  Whilst I have been a happy snapper most of my life, I have only really got going properly with photography since 2013 and have rapidly absorbed a lot of advice on techniques, theory and sources of inspiration from a range of helpful people who have taken the time to answer my, often dumb, questions. Lynn actually studied photography as part of her degree but old school style with film and has also only got going relatively recently with digital.

The disclaimer is therefore, that I am only able to write about what I know obviously and there is a lot that I don’t know.  So here you go – I’ll focus on what I currently do and the kit I use, as it gets confusing if I try to write a combined workflow description for both of us. I hope it is helpful.

Kit

I am  not particularly interested in the fine technical details of kit.  I try to keep the kit simple so I can concentrate on making images. In 2013, I started learning  how to shoot using the manual setting on a Nikon D3200 with 18-55mm lens, ideal for beginners. I did some research, got some advice and subsequently upgraded to a Fujifilm XE-2 with 18-55mm lens.

Using the Fuji camera and lens led to an immediate improvement in image quality, if not always the shots I took. Significantly, the XE-2 was smaller and lighter, ideal for use for street and urban photography. I then added a 35mm lens, with an aperture option of f1.4, my current favourite lens, ideal for shooting in low light. I also got a 55-200mm telephoto zoom. This gives me the range of lens options to cover most of what I want to shoot.

Fujifilm XE-2 Camera

Fujifilm XE-2 (Image by Fujifilm).

The XE-2 is a rangefinder style camera (viewfinder at top left looking from the back) with an electronic viewfinder (EVF) that gives live preview based on current settings, recently updated to the latest Firmware (Camera operating system). Fujifilm do regular updates to their Firmware and this means that my camera and lense have had several improvements to things like autofocus speed and more.

Lenses

Taking Black and White pictures

I’ll not say too much on composition, what to shoot or why shoot this or that, as there is plenty of advice out there and lots of inspirational photographers. The main things I have found out that work for me when taking shots are:

  • Try to ‘see in BW’, think about texture, tone and shape, don’t be distracted by colours, unless you know they will work well for what you want to achieve in BW.
  • If you have a Fuji X-Series camera with EVF, you can set the camera to shoot BW JPEG (or RAW plus JPEG) and it will give you a BW live preview, useful for practising or previewing complex  scenes in BW.
  • Rain, mist, snow, hail, all of these can be good. Diffuse light, such as on a glorious cloudy summer’s day in Scotland gives good results too.
  • A good colour image won’t always make a good black and white – I often see people posting a ‘failed’ colour shot as BW and it usually doesn’t work in my opinion.

We both shoot in RAW, to allow custom processing, although my Fujifilm XE-2 and Lynn’s XT-10 both create very nice JPEGS in camera.

Processing the RAW file

The following is my current workflow. It isn’t extensive, probably not clever, but it works for me and I hope may help you to see something useful for you too.

Software

We use Adobe Creative Cloud and have a subscription for Photoshop (Editing Images), Bridge (Managing Images) and Lightroom (a bit of both, but not used), which currently costs about £9 per month. If you don’t have Photoshop, you can download a 30-day free trial.

We also use Google NIk Tools plugins, which work with Photoshop and Lightroom, in particular the Silver Efex Monochrome tools. The latter is highly recommended and is now free to download.

An example run through

This is just a quick example with the basic information that I’ve been asked about.

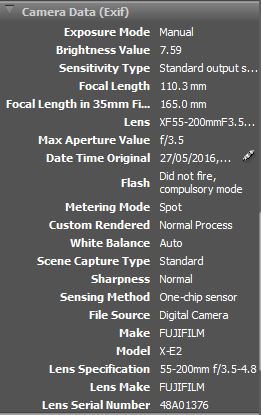
Here’s an unprocessed image, taken a couple of days ago when Edinburgh had some lovely haar (sea mist) for us to play around with.  It was shot with the Fujifilm XE-2 and the XF 55-200mm lens at f6.4, 110mm, 1/100th sec and ISO 640 (Exif snapshot info below).

Unprocessed image. Martyrs Monument, Edinburgh. Photo by and copyright of Paul Henni.
Unprocessed image. Martyrs’ Monument, Edinburgh. Photo by and copyright of Paul Henni.
Image Exif (Technical Details).
Image Exif (Technical Details). Photo by and copyright of Paul Henni.

The Fujifilm RAW (.raf) file was opened in the Photoshop RAW editor for some basic editing. In this case, looking at the image histogram, the tonal range seemed good for what I wanted to achieve – you can do a wide range of editing at this stage prior to going into Photoshop. In this case I went to the Dehaze option to ADD a little haze, the opposite of what the tool is designed for, to give me a little more haar to play with.

Adobe Photoshop RAW Editor interface, showing Dehaze tool.
Adobe Photoshop RAW Editor interface, showing Dehaze tool, which can add or remove haze. Photo by and copyright of Paul Henni.

Next, into Photoshop, shown here with the Google NIK Tools Interface. If you want to use the Silver Efex tools, simple click on the button on this interface. This will give you this next interface.

Google NIk Tools - Silver EFEX Interface with image. Photo by and copyright of Paul Henni.
Google NIk Tools – Silver EFEX Interface with image. Photo by and copyright of Paul Henni.

If you haven’t used Silver Efex before, I recommend you play around with the existing presets, try things out and try to learn what the various controls on the right hand side do. Some are quite subtle and, you’ve guessed it, some are not. there are some good tutorials out there, including on the Google Silver Efex web page.

At this point, I used a saved custom preset I’ve made based on one of the existing ones called (016) – Full Dynamic (Smooth).

I then did a final adjustment to the depth of the blacks and some of the mid-tones using a Levels Adjustment layer. here’s the end result.

I’d be interested in any feedback on whether this was useful to you or not via the comments below or by sending me an email.

Final Processed Image. Martyrs Monument, Edinburgh. Photo by and copyright of Paul Henni.
Final Processed Image. Martyrs’ Monument, Edinburgh. Photo by and copyright of Paul Henni.

#BBC #Secret #Agent #Film #Set #Edinburgh #Photo #Soho #London www.henni.photo

Post by Paul Henni.

Update – The Series is now due to start on Sunday the 17th July at 21:00 on BBC One. More details.

I stumbled across the aftermath of filming for the upcoming BBC One TV Series The Secret Agent, based on the novel by Joseph Conrad. Edinburgh’s Thistle Street Lane was standing in for London’s Soho in the 19th Century, with a small set built to show a little bit of the seedier part of the city, including Verloc’s dodgy shop.

The set was designed by David Roger (all designs copyright David Roger) and ingeniously used shallow depth fronts to give the impression of having entire buildings behind them, very cleverly and skilfully done. I was taken in even when standing up close in the half dis-assembled set.

Looks like a series to watch, given the quality of the cast, writer and the production team, with stars including Toby Jones, Vicky McClure, Stephen Graham and, an actor I particularly admire, Ian Hart.

Here are a selection of post-shooting photos of the set, in the process of being dismantled and the lane tidied up. A pity I couldn’t have done some stills of the actual filming, but that wouldn’t have been possible, as you can imagine, unless I was part of the crew. Images shot quickly on a Fujifilm XE-2 with 35mm lens.

Faulkner & James Co. (The Secret Agent Set). Photo by and copyright of Paul Henni.
Advertisements (The Secret Agent Set). Photo by and copyright of Paul Henni.
Shop Window (The Secret Agent Set). Photo by and copyright of Paul Henni.
Pawnbroker (The Secret Agent Set). Photo by and copyright of Paul Henni.
Shop Window (Secret Agent Set). Photo by and copyright of Paul Henni.
Sol's Balls (The Secret Agent Set). Photo by and copyright of Paul Henni.
Sol’s Balls (The Secret Agent Set). Photo by and copyright of Paul Henni.
Advertisements (The Secret Agent Set). Photo by and copyright of Paul Henni.
Sol's Arms (The Secret Agent Set). Photo by and copyright of Paul Henni.
Sol’s Arms (The Secret Agent Set). Photo by and copyright of Paul Henni.
Splended Burton Ale (The Secret Agent Set). Photo by and copyright of Paul Henni.
After The Shoot (The Secret Agent Set). Photo by and copyright of Paul Henni.